Structural Image Similarity Check using SSIM
How to check if two images are similar (like humans do)?
When comparing two similar images, traditional methods like Mean Squared Error (MSE) often fall short. They focus on pixel differences, which can lead to misleading results. For example, two images stored in JPEG and uncompressed bitmap might look nearly identical to the human eye, but MSE could indicate a significant difference dues to compression artifacts.
Structural Similarity Index Measurement (SSIM)?
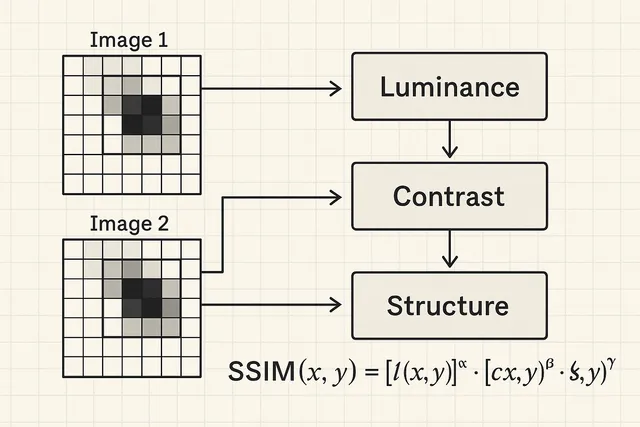
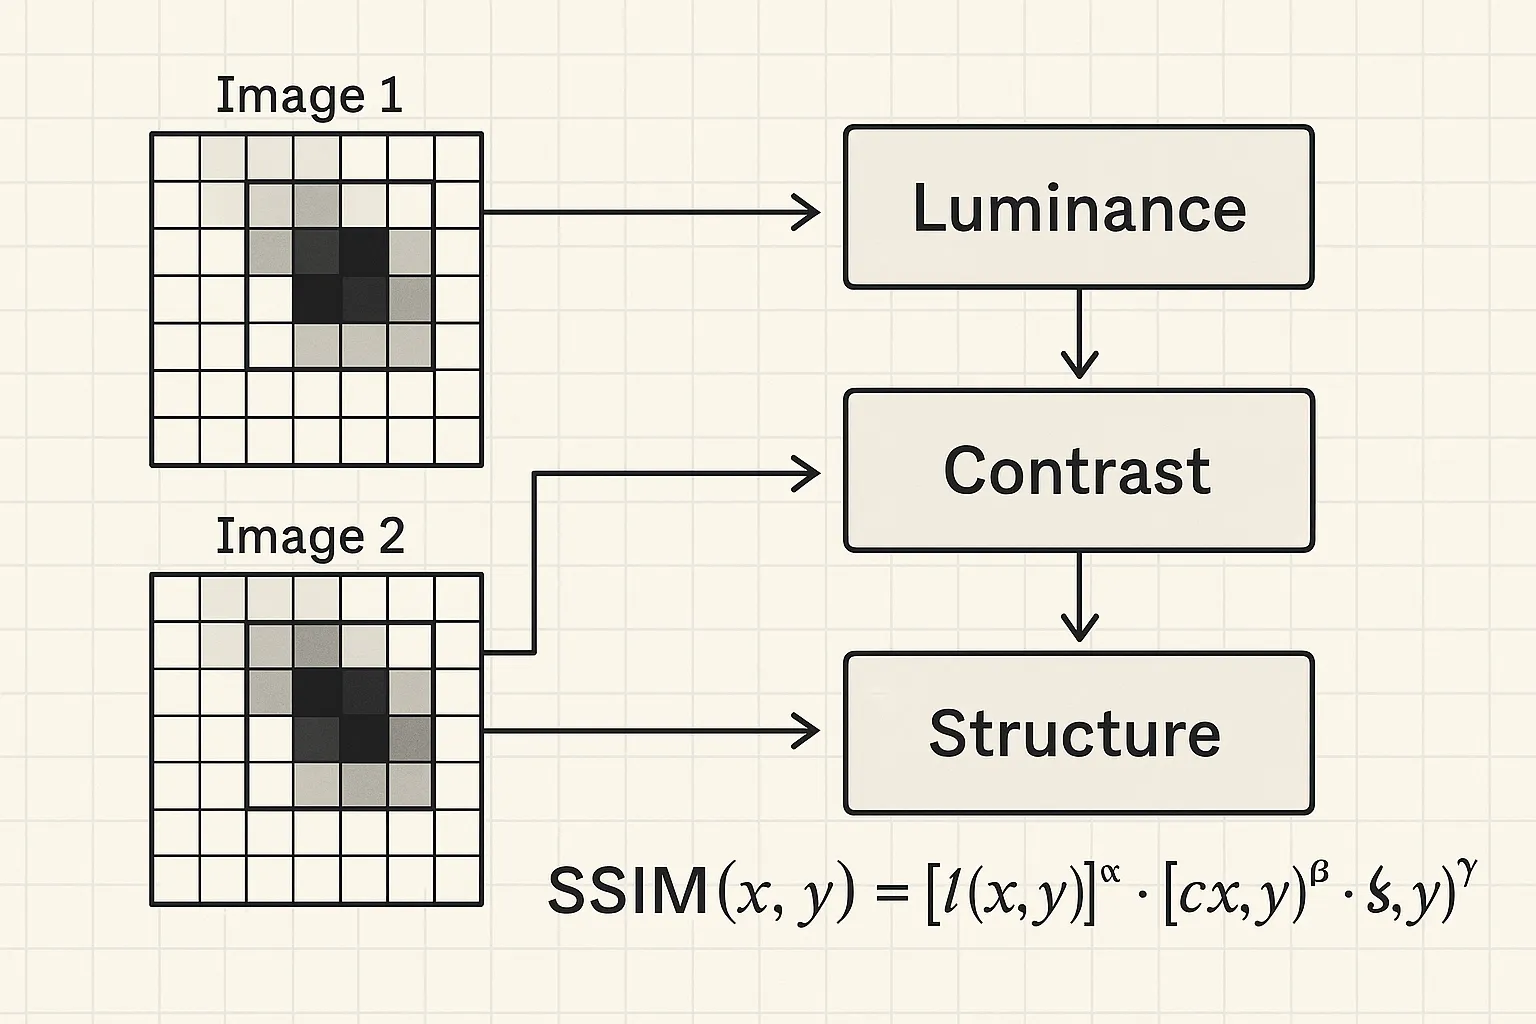
Structural Similarity Index Measurement (SSIM) is a perceptual metric that mimics how humans judge image similarity. Instead of iterating over individual pixel differences, SSIM focuses on three things humans care about:
- Luminance - Overall brightness levels
- Contrast - How much variation exists
- Structure - The patterns and shapes we see
By measuring these three components and combining them, SSIM produces a score that aligns much better with human perception.
SSIM (Structural Similarity Index)
Score Interpretation:
- • 1.0 = Identical images
- • > 0.95 = Very similar (green)
- • 0.8 - 0.95 = Similar (orange)
- • < 0.8 = Different (red)
Key Insights:
- • Geometric transforms drastically reduce SSIM
- • Gaussian blur is smoother than box blur
- • Brightness has minimal impact
- • Structure changes matter most
Notice how SSIM captures perceptual similarity better than pixel-wise comparison. Small shifts or compressions that preserve structure yield high scores, while changes that affect patterns score lower.
How SSIM Works: The Intuition
Think of SSIM like a quality inspector with a magnifying glass. It slides a small window (typically 11x11 pixels) across both images, examining local regions one at a time. At each position, it asks three questions:
- Luminance: “Are these regions similarly bright?”
- Contrast: “Do they have similar amounts of variation?”
- Structure: “Do the patterns match up?”
For each window, these three measurements are combined into a local similarity score. The final SSIM is the average of all these local scores.
The Mathematical Foundation
Mathematically, SSIM combines the three components using this formula:
Where:
- is the luminance comparison,
- is the contrast comparison,
- is the structural comparison,
- and are parameters (typically set to 1) that control the relative importance of each component.
Each component is calculated as:
Luminance:
Contrast:
Structure:
Where:
- represents the mean (average brightness)
- represents the standard deviation (contrast)
- represents the covariance (how patterns correlate)
- , , are small constants preventing division by zero
The final score ranges from 0 to 1, where:
- 1 = Identical images
- 0.9-1 = Excellent quality (imperceptible differences)
- 0.7-0.9 = Good quality (barely noticeable differences)
- < 0.7 = Poor quality (obvious differences)
Building SSIM from Scratch
Now that we understand the theory, let’s implement SSIM step by step in TypeScript. We’ll start with the basic structure and gradually build up each component.
Step 1: Define the Interface
// Define types for image data representation
interface ImageData {
  width: number;
  height: number;
  data: Uint8Array; // Pixel data in RGBA format
}

// SSIM configuration parameters
interface SSIMConfig {
  windowSize?: number;// Size of the sliding window (default: 11)
  k1?: number;// Stabilization constant for luminance (default: 0.01)
  k2?: number;// Stabilization constant for contrast (default: 0.03)
  alpha?: number;// Weight for luminance component (default: 1)
  beta?: number;// Weight for contrast component (default: 1)
  gamma?: number;// Weight for structure component (default: 1)
}

// Main SSIM function signature
function calculateSSIM(
  image1: ImageData,
  image2: ImageData,
  config: SSIMConfig = {}
): number {
  // Validate input images have same dimensions
  if (image1.width !== image2.width || image1.height !== image2.height) {
    throw new Error('Images must have the same dimensions');
  }

  // Initialize with default values
  const {
    windowSize = 11,
    k1 = 0.01,
    k2 = 0.03,
    alpha = 1,
    beta = 1,
    gamma = 1
  } = config;

  // TODO: Implement SSIM calculation
  return 0;
}
Step 2: Luminance Comparison
The first component compares average brightness. When both regions have similar brightness, this value approaches 1.
// Luminance comparison function
// l(x,y) = (2 * μx * μy + C1) / (μx² + μy² + C1)
function luminanceComparison(
  mean1: number,
  mean2: number,
  c1: number
): number {
  const numerator = 2 * mean1 * mean2 + c1;
  const denominator = mean1 * mean1 + mean2 * mean2 + c1;
  return numerator / denominator;
}
Step 3: Contrast Comparison
Next, we compare how much variation exists in each region. High contrast means lots of variation from the mean.
// Contrast comparison function
// c(x,y) = (2 * σx * σy + C2) / (σx² + σy² + C2)
function contrastComparison(
  stdDev1: number,
  stdDev2: number,
  c2: number
): number {
  const numerator = 2 * stdDev1 * stdDev2 + c2;
  const denominator = stdDev1 * stdDev1 + stdDev2 * stdDev2 + c2;
  return numerator / denominator;
}
Step 4: Structure Comparison
The structure component captures whether the patterns in both regions “move together” - high values where one is high, low where one is low.
// Structure comparison function
// s(x,y) = (σxy + C3) / (σx * σy + C3)
// where σxy is the covariance between windows
function structureComparison(
  covariance: number,
  stdDev1: number,
  stdDev2: number,
  c3: number
): number {
  const numerator = covariance + c3;
  const denominator = stdDev1 * stdDev2 + c3;
  return numerator / denominator;
}
Step 5: Sliding Window Implementation
Now we implement the sliding window mechanism that moves across both images, extracting local regions for comparison.
// Helper function to extract a window of pixels from an image
function getWindow(
  image: ImageData,
  x: number,
  y: number,
  windowSize: number
): number[] {
  const window: number[] = [];
  const halfWindow = Math.floor(windowSize / 2);

  for (let wy = -halfWindow; wy <= halfWindow; wy++) {
    for (let wx = -halfWindow; wx <= halfWindow; wx++) {
      const px = x + wx;
      const py = y + wy;

      // Handle boundary conditions with mirror padding
      const clampedX = Math.max(0, Math.min(image.width - 1, px));
      const clampedY = Math.max(0, Math.min(image.height - 1, py));

      // Extract grayscale value from RGBA data
      // Using luminance formula: 0.299*R + 0.587*G + 0.114*B
      const idx = (clampedY * image.width + clampedX) * 4;
      const gray = 0.299 * image.data[idx] +
                   0.587 * image.data[idx + 1] +
                   0.114 * image.data[idx + 2];

      window.push(gray);
    }
  }

  return window;
}

// Apply SSIM calculation across the entire image
function applySSIMWindows(
  image1: ImageData,
  image2: ImageData,
  windowSize: number,
  k1: number,
  k2: number
): number[] {
  const ssimValues: number[] = [];
  const halfWindow = Math.floor(windowSize / 2);

  // Iterate through valid window positions
  for (let y = halfWindow; y < image1.height - halfWindow; y++) {
    for (let x = halfWindow; x < image1.width - halfWindow; x++) {
      const window1 = getWindow(image1, x, y, windowSize);
      const window2 = getWindow(image2, x, y, windowSize);

      // Calculate SSIM for this window (to be implemented)
      const ssim = calculateWindowSSIM(window1, window2, k1, k2);
      ssimValues.push(ssim);
    }
  }

  return ssimValues;
}
Step 6: Bringing It All Together
Now we’ll combine all components to calculate SSIM for a single window. This is where the magic happens:
// Calculate mean (average luminance) of a window
function calculateMean(window: number[]): number {
  const sum = window.reduce((acc, val) => acc + val, 0);
  return sum / window.length;
}

// Calculate variance (squared standard deviation) of a window
function calculateVariance(window: number[], mean: number): number {
  const sumSquaredDiff = window.reduce((acc, val) => {
    const diff = val - mean;
    return acc + diff * diff;
  }, 0);
  return sumSquaredDiff / window.length;
}

// Calculate covariance between two windows
function calculateCovariance(
  window1: number[],
  window2: number[],
  mean1: number,
  mean2: number
): number {
  let sum = 0;
  for (let i = 0; i < window1.length; i++) {
    sum += (window1[i] - mean1) * (window2[i] - mean2);
  }
  return sum / window1.length;
}

// Calculate SSIM for a single window
function calculateWindowSSIM(
  window1: number[],
  window2: number[],
  k1: number,
  k2: number
): number {
  // Calculate statistics for both windows
  const mean1 = calculateMean(window1);
  const mean2 = calculateMean(window2);

  const variance1 = calculateVariance(window1, mean1);
  const variance2 = calculateVariance(window2, mean2);

  const stdDev1 = Math.sqrt(variance1);
  const stdDev2 = Math.sqrt(variance2);

  const covariance = calculateCovariance(window1, window2, mean1, mean2);

  // Dynamic range L is 255 for 8-bit images
  const L = 255;

  // Calculate stability constants
  // C1 = (k1 * L)² and C2 = (k2 * L)²
  const c1 = Math.pow(k1 * L, 2);
  const c2 = Math.pow(k2 * L, 2);
  const c3 = c2 / 2; // Often set to C2/2

  // Calculate individual components
  const luminance = luminanceComparison(mean1, mean2, c1);
  const contrast = contrastComparison(stdDev1, stdDev2, c2);
  const structure = structureComparison(covariance, stdDev1, stdDev2, c3);

  // Combine components (with default weights α=β=γ=1)
  return luminance * contrast * structure;
}
Step 7: Complete Implementation
Finally, let’s complete our SSIM implementation by averaging scores across all windows:
// Updated main SSIM function with full implementation
function calculateSSIM(
  image1: ImageData,
  image2: ImageData,
  config: SSIMConfig = {}
): number {
  // Validate input images have same dimensions
  if (image1.width !== image2.width || image1.height !== image2.height) {
    throw new Error('Images must have the same dimensions');
  }

  // Initialize with default values
  const {
    windowSize = 11,
    k1 = 0.01,
    k2 = 0.03,
    alpha = 1,
    beta = 1,
    gamma = 1
  } = config;

  // Apply SSIM to all windows in the image
  const ssimValues = applySSIMWindows(
    image1,
    image2,
    windowSize,
    k1,
    k2
  );

  // Return mean SSIM across all windows
  const meanSSIM = ssimValues.reduce((sum, val) => sum + val, 0) / ssimValues.length;

  // Clamp result to [-1, 1] range (though typically [0, 1])
  return Math.max(-1, Math.min(1, meanSSIM));
}
Implementation Notes
Our implementation is simplified for clarity. Production implementations typically include:
- Gaussian weighting: Windows use Gaussian weights instead of uniform weights
- Multi-scale SSIM (MS-SSIM): Evaluates similarity at multiple resolutions
- Performance optimizations: SIMD instructions, GPU acceleration
- Color handling: Proper color space conversions (not just grayscale)
Summary
SSIM aligns with human perception. Unlike pixel-based metrics, it captures what matters to our visual system: brightness, contrast, and structure. While our implementation is simplified, it demonstrates the core concepts that make SSIM so effective.
The key takeaway? When comparing images, think like a human, not like a computer counting pixel differences.
Here is the flowchart of the SSIM process: